Imagine biting into a soft, fluffy Italian flatbread with a tangy taste. It’s a treat you can’t resist. You’re starting a journey to make your own homemade sourdough focaccia. It’s a dish that will wow everyone you share it with.
This guide will teach you how to make the perfect focaccia with sourdough starter. It’s simpler than you might think, and the joy of making it is just as great as eating it.
By following our easy steps, you’ll make a tasty homemade sourdough focaccia. It’s great with soups or dips.
Table of Contents
The Origins and Appeal of Sourdough Focaccia
Starting your journey to bake the perfect sourdough focaccia? Learning about its origins can make you appreciate this traditional Italian bread more. Sourdough focaccia is a twist on the classic Italian flatbread. It uses a sourdough starter instead of commercial yeast.
A Brief History of Focaccia Bread
Focaccia’s history goes back to ancient Italy, where it was a simple flatbread. It grew to include toppings and ingredients, becoming a key part of Italian cuisine. The basic recipe for easy focaccia bread includes flour, water, salt, and olive oil.
Why Sourdough Makes Focaccia Better
Using a sourdough starter in focaccia makes it taste better and feel chewier. This is thanks to the lactic acid from fermentation. It adds a tangy flavor and a unique texture.
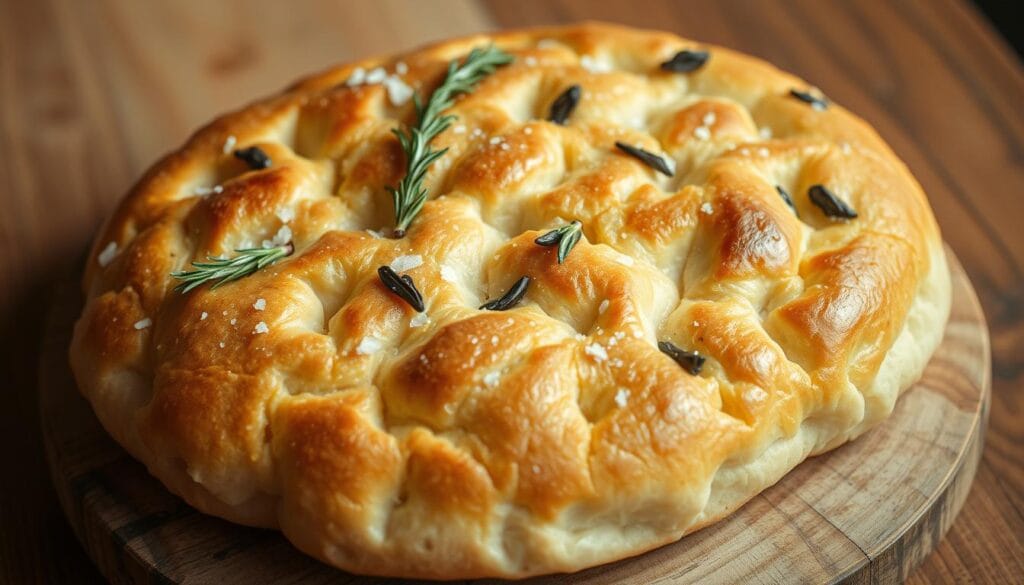
Trying sourdough focaccia variations can lead to tasty and unique breads. You can make them with rosemary and olive oil, or sea salt and garlic. The result is an authentic Italian sourdough focaccia that’s full of flavor and aroma. It’s great for dipping in olive oil or with your favorite Italian dishes.
The Complete Focaccia Sourdough Recipe: Ingredients Overview
Making a great sourdough focaccia starts with the right ingredients. You need to pick each item carefully for the best taste and texture. A rustic sourdough focaccia should be crispy on the outside and soft on the inside.
Flour Selection and Quality
The flour you pick is key for the dough’s texture and taste. For a best sourdough focaccia recipe, use a high-protein flour like King Arthur or Caputo. These flours give the dough its chewiness and strength.
Salt, Water, and Oil Considerations
Salt adds flavor and helps control yeast. Use a good sea salt or kosher salt. Water should be fresh and at room temperature. Choose a mild olive oil for its flavor and health benefits.
Sourdough Starter Requirements
A healthy sourdough starter is vital for the focaccia’s rise and tang. Make sure your starter is active and bubbly before mixing it into the dough.
| Ingredient | Quantity | Notes |
|---|---|---|
| Flour | 500g | High-protein bread flour |
| Water | 350ml | Room temperature |
| Sourdough Starter | 150g | Active and bubbly |
| Salt | 10g | Sea salt or kosher salt |
| Olive Oil | 20g | Mild olive oil |
Tools and Equipment You’ll Need
Before you start mixing your sourdough focaccia dough, it’s crucial to have the right tools on hand. Making homemade sourdough focaccia requires some essential equipment. This ensures the process is smooth and the result is delicious.
Mixing and Measuring Tools
You’ll need a large mixing bowl, preferably made of a non-reactive material like stainless steel or glass. Accurate measurements are key in bread making. So, having a digital scale and measuring cups is indispensable.
A dough whisk or a wooden spoon is necessary for mixing the dough. A rubber spatula will help with scraping the sides of the bowl.
Baking Vessels and Surfaces
For baking your focaccia, you’ll need a baking pan or a cast-iron skillet. A 9×13 inch baking pan is ideal for creating a classic focaccia shape. If you prefer a more rustic look, a cast-iron skillet can achieve a crispy crust.
Additionally, parchment paper or a lightly oiled surface will prevent the dough from sticking.
Having the right tools and equipment makes the process of making step-by-step sourdough focaccia more enjoyable. It also ensures that your bread turns out as expected. Investing in quality tools will make a noticeable difference in your baking experience.
Preparing Your Sourdough Starter
Before you mix your focaccia dough, your sourdough starter must be active and bubbly. A healthy starter is key to a tasty sourdough focaccia recipe. It gives the dough the rise and flavor it needs.
Feeding Schedule Before Baking
To get your starter ready for baking, follow a regular feeding schedule. Feed it once a day with equal parts flour and water. For example, if you have 100g of starter, add 100g of flour and 100g of water. This keeps your starter healthy and active.
Testing for Starter Readiness
How do you know your starter is ready for your easy focaccia bread recipe? Look for these signs:
- The starter should be bubbly and slightly frothy.
- It should have nearly doubled in size since the last feeding.
- A healthy starter smells like sour yogurt or vinegar.
Creating a Levain (Optional)
Some bakers make a levain before mixing their dough. A levain is a mix of flour, water, and starter that ferments first. To make a levain, mix a small starter with flour and water. Let it ferment for a few hours until it’s bubbly and active.
Mixing and Developing the Focaccia Dough
To get the perfect focaccia, start by mixing the dough right. This step is key for the dough’s texture. It makes the focaccia crunchy yet soft.
Initial Mix and Autolyse
First, mix flour and water in a big bowl. Mix until it’s just combined. Then, let it rest for 20-30 minutes. This step, called autolyse, helps the flour soak up water well.
Incorporating the Starter
Next, add the sourdough starter to the dough. Fold it in gently until it’s mixed well. This ensures the yeast spreads evenly, for even fermentation.
Adding Salt and Olive Oil
Now, add salt and olive oil. Salt makes it taste better, and olive oil makes it soft and golden. Mix well, but don’t overdo it to avoid a dense focaccia.
| Ingredient | Quantity | Purpose |
|---|---|---|
| Flour | 500g | Provides structure |
| Water | 350ml | Hydrates flour |
| Sourdough Starter | 150g | Facilitates fermentation |
| Salt | 10g | Enhances flavor |
| Olive Oil | 20g | Adds tenderness and flavor |
By following these steps, you’ll make a tasty homemade sourdough focaccia or rustic sourdough focaccia. Just be gentle with the dough and let it develop slowly.
The Bulk Fermentation Process

The journey to perfecting your best sourdough focaccia recipe continues with bulk fermentation. This step is crucial for developing the dough’s flavor and texture. During this phase, the dough undergoes significant changes that will affect the final product’s quality.
Stretch and Fold Technique
The stretch and fold technique is a key part of bulk fermentation. It involves gently stretching the dough and folding it back onto itself several times. This method helps distribute yeast cells, develops gluten, and prevents the dough from becoming too dense.
To perform this technique, wet your hands to prevent sticking. Then, grab the dough from one side and stretch it upwards before folding it back onto itself. Repeat this 3-4 times, rotating the dough each time for even development.
Temperature Considerations
Temperature is vital in bulk fermentation. The ideal temperature for fermenting sourdough focaccia is between 75°F to 78°F (24°C to 25°C). If the temperature is too high, fermentation can happen too quickly, leading to over-proofing. If it’s too low, fermentation slows down.
Keeping the temperature consistent within this range helps achieve a better fermentation. This results in a more predictable and quality fermentation.
Visual Cues for Proper Fermentation
It’s important to monitor your dough for visual cues to ensure proper fermentation. Look for signs like an increase in volume, bubbles on the surface or within the dough, and a slightly domed appearance. A well-fermented dough should have a slightly sour aroma and feel relaxed, not tense.
| Visual Cue | Indication |
|---|---|
| Increased volume | Active fermentation |
| Surface bubbles | Yeast activity |
| Domed appearance | Proper proofing |
By managing the bulk fermentation process well, you’ll create a deliciously crispy sourdough focaccia. This showcases your baking skills.
Preparing the Baking Pan
Before you start shaping your focaccia, it’s crucial to prepare your baking pan properly. A well-prepared pan ensures that your sourdough focaccia will release easily after baking. This keeps its dimpled surface and fluffy texture intact.
Oil Selection and Application
The type of oil you use can affect the flavor of your focaccia. Olive oil is a popular choice because of its rich flavor. It complements the sourdough well. To apply the oil, pour a generous amount into the pan. Then, use your hands or a spatula to spread it evenly, making sure the entire surface is coated.
Pan Size and Material Recommendations
The size and material of your baking pan can impact the baking process. A 9×13 inch pan is standard for focaccia, giving the dough enough space to spread. For better browning, a heavy-duty, dark-colored pan is recommended. Also, consider a pan with a non-stick coating for easier release.
| Pan Size | Material | Benefits |
|---|---|---|
| 9×13 inches | Non-stick coated | Easy release, less cleanup |
| 9×13 inches | Dark-colored metal | Enhanced browning, crispy crust |
Shaping and Dimpling Your Focaccia
Shaping focaccia is all about gently molding the dough into a unique shape. This step is key to creating the dimples that hold the olive oil and toppings. It makes your homemade sourdough focaccia both beautiful and tasty.
Transferring Dough to the Pan
First, oil your baking pan well. Then, place the dough in the pan carefully. Don’t overwork it. Spread the dough evenly, making sure it touches the pan’s edges.
Creating the Classic Dimpled Texture
With the dough in the pan, use your fingers to make dimples. Press down at regular spots, but don’t break the dough. This step gives focaccia its unique texture and helps spread olive oil evenly.
Final Proof Timing
After shaping and dimpling, let the focaccia proof. The time needed depends on the temperature and your sourdough starter’s strength. Usually, it takes 1-2 hours at room temperature. Watch it; the dough should look relaxed and slightly puffed.
| Proofing Time | Temperature | Dough Condition |
|---|---|---|
| 1-2 hours | Room Temperature | Relaxed, Slightly Puffed |
| 4-6 hours | Cold Environment | Slow Rise, More Flavor |
By following these steps, you’ll make an authentic Italian sourdough focaccia. A well-proofed dough and the right dimpling technique will balance its texture and flavor perfectly.
Creative Toppings and Flavor Variations

Sourdough focaccia is a blank canvas for your creativity. You can use classic Italian flavors or try new seasonal ingredients. Making your own sourdough focaccia lets you explore many toppings and flavors.
Classic Italian Toppings
Traditional toppings include olive oil, rosemary, sea salt, and cherry tomatoes. These add flavor and texture to your focaccia.
Seasonal Ingredient Combinations
Seasonal ingredients can make your sourdough focaccia even better. In autumn, try caramelized onions and fig jam. In summer, go for fresh basil and mozzarella.
Sweet Focaccia Variations
Focaccia can also be sweet. Make a sweet version with cinnamon and sugar, or fresh berries. It’s perfect for dessert or a snack.
| Topping | Flavor Profile | Seasonality |
|---|---|---|
| Rosemary and Olive Oil | Herbaceous, Savory | Year-round |
| Caramelized Onions and Fig Jam | Sweet, Savory | Autumn |
| Fresh Basil and Mozzarella | Fresh, Creamy | Summer |
Trying new toppings and flavors keeps your sourdough focaccia exciting. It lets you match it to your taste or the occasion.
Baking Techniques for Crispy Yet Fluffy Results
Baking sourdough focaccia to perfection is more than just tossing it in the oven. It needs careful thought on temperature, steam, and timing. Getting that perfect mix of a crispy crust and fluffy inside is a skill you can learn.
Oven Temperature and Steam
Getting your oven to the right temperature is key. A hot oven, around 450°F (230°C), helps make a crispy crust. Steam is also crucial for crispiness. You can make steam by putting a pan of water in the oven or using a steam injector if your oven has one.
Steam Generation Techniques:
- Using a baking stone or steel to retain heat
- Placing a pan of water on the lower rack
- Spraying water into the oven with a spray bottle
Baking Time and Visual Cues
The baking time depends on your focaccia’s size and your oven. Usually, it takes 20 to 25 minutes for a standard focaccia. Look for a golden-brown color and a crispy crust to know it’s done.
| Baking Time (minutes) | Visual Cue |
|---|---|
| 15-20 | Edges start to golden |
| 20-25 | Entire surface is golden brown |
Jeffrey Hamelman, a famous baker, says, “A well-baked focaccia should have a crispy crust and a tender inside. It should also have a rich, slightly sour taste.”
“A well-baked focaccia should have a crispy crust and a tender interior, with a rich, slightly sour flavor profile.” – Jeffrey Hamelman
Cooling Process
After baking, cool your focaccia right to keep its texture. Let it cool on a wire rack for 10-15 minutes before slicing. This helps the steam escape, so your focaccia stays fluffy.
By learning these baking techniques, you’ll make deliciously crispy yet fluffy sourdough focaccia. It will surely impress everyone who tries it.
Storing, Freezing, and Refreshing Your Focaccia
After baking your focaccia, you need to figure out how to keep it fresh. Storing it properly is key to keeping your homemade sourdough focaccia at its best.
Short-term Storage Methods
For a short time, you can store your focaccia at room temperature for up to 2 days. Use plastic wrap or aluminum foil to keep it moist. If you won’t eat it soon, think about refrigerating or freezing it.
Freezing and Thawing Techniques
To freeze your focaccia, wrap it well in plastic wrap or freezer-safe bags. It can stay frozen for up to 3 months. To thaw, let it sit at room temperature or refrigerate it overnight.
| Storage Method | Duration |
|---|---|
| Room Temperature | Up to 2 days |
| Refrigerator | Up to 5 days |
| Freezer | Up to 3 months |
Reheating for Best Texture
To refresh your focaccia, preheat your oven to 375°F (190°C). Wrap the focaccia in foil and heat for 5-10 minutes. For a crispy crust, remove the foil for the last 2 minutes.
Conclusion: Enjoying Your Homemade Sourdough Focaccia
Now you’ve learned how to make fluffy sourdough focaccia. It’s time to enjoy your freshly baked focaccia. Top it with your favorite ingredients and feel the joy of baking bread yourself.
Trying out different focaccia recipes can be a lot of fun. You can add olive oil, herbs, or cheese for a tasty snack or side dish. This bread goes well with many meals, like soups or salads.
As you keep working with your sourdough starter, you’ll find new flavors and textures. Don’t hesitate to try new things – it’s all part of the fun. With your skills, you’ll make focaccia that will wow everyone.